OAuth2
OAuth2, short for "Open Authorization 2.0", is an authorization framework that enables third-party applications to access resources on behalf of a user without needing to disclose their credentials. It provides a standardized way for users to grant limited access to their resources hosted on one website to another website without sharing their credentials. OAuth2 is widely used across various applications and platforms, including social media, cloud services, and APIs, to facilitate secure and controlled access to user data.
Solytic offers a GraphQL API to access site and device data. To obtain an access token the client must first obtain authorization from the resource owner. This authorization is conveyed through OAuth2 authorization grant flows which the client utilizes to request an access token.
The following OAuth2 grant types are supported:
- Client Credentials Grant
- Authorization Code Grant
The subsequent sections will provide details on how your application can utilize each of these flows to access our GraphQL API.
Solytic OAuth2 flows are based on the following RFCs that you can use to better understand how, as a client, you should consume REST endpoints and apply security recommendations:
Application Registration
To initiate any of the supported OAuth flows, you must have an application registered in our authorization server. We currently do not offer any user interface that would allow you to do it by yourself, so you need to contact our sales/support team. Please refer to Application Registration on how to register your application and obtain a client ID and secret.
OAuth2 Client Credentials Grant Flow
The OAuth2 Client Credentials Grant Flow is primarily used for server-to-server communication, where the client application is considered to be a confidential client, typically a backend service or application acting on its behalf, rather than on behalf of a user. This means that the client application is trusted with sensitive information, such as a client secret, which is used to authenticate itself with the authorization server.
This flow is suitable for scenarios where the client application owns the resources it's accessing (e.g. Solytic Customers) and doesn't need to act on behalf of a user. It provides a straightforward method for obtaining access tokens and securely accessing protected resources.
Using the Client Credentials Grant Flow in mobile or web applications, particularly single-page applications (SPAs), poses significant security risks and is generally not recommended.
Flow
To begin utilizing the OAuth2 Client Credentials Grant Flow, the third-party uses the ClientID and ClientSecret to authenticate by logging in through our GraphQL loginApplication mutation endpoint. Upon successful authentication, they will receive an access token, enabling them to securely access the authorized resources.
 +---------+                                  +---------------+
 |         |                                  |               |
 |         |>--(A)- Client Authentication --->| Authorization |
 | Client  |                                  |     Server    |
 |         |<--(B)---- Access Token ---------<|               |
 |         |                                  |               |
 +---------+                                  +---------------+
Please refer to Your First Query to understand how to use the access token to consume our GraphQL queries and mutations, including the refresh token mechanism.
OAuth2 Authorization Code Grant Flow
The OAuth2 Authorization Code Grant Flow is a method for obtaining an access token on behalf of a user. The client initiates the flow by redirecting the user to the authorization server, where the user logs in and grants permissions. Upon consent, the authorization server generates an authorization code, which the client exchanges for an access token. This token allows the client to access protected resources on behalf of the user.
This flow is ideal for any third-party application that lacks direct access to user data but aims to offer supplementary services to users beyond the Solytic domain.
PKCE (Proof Key for Code Exchange)
The PKCE (Proof Key for Code Exchange) extension enhances the OAuth2 authorization code grant flow by introducing a security measure suitable for mobile and public client applications like Single Page Apps (SPAs). Instead of relying solely on a client secret, PKCE generates a unique "code verifier" and "code challenge" for each authorization request. This prevents interception attacks, ensuring that even if an attacker obtains the authorization code, they cannot exchange it for an access token without the original "code verifier." This added layer of security mitigates risks associated with clients unable to securely store a client secret.
Flow
It involves a series of steps where the client application redirects the user to the authorization server's login page, where they authenticate themselves and grant permission to the client application. Upon successful authentication and authorization, the authorization server redirects the user back to the client application with an authorization code. The client then exchanges this code for an access token and optionally a refresh token, allowing it to access protected resources on behalf of the user.
 +----------+
 | Resource |
 |   Owner  |
 |          |
 +----------+
      ^
      |
     (B)
 +----|-----+          Client Identifier      +---------------+
 |         -+----(A)-- & Redirection URI ---->|               |
 |  User-   |                                 | Authorization |
 |  Agent  -+----(B)-- User authenticates --->|     Server    |
 |          |                                 |               |
 |         -+----(C)-- Authorization Code ---<|               |
 +-|----|---+                                 +---------------+
   |    |                                         ^      v
  (A)  (C)                                        |      |
   |    |                                         |      |
   ^    v                                         |      |
 +---------+                                      |      |
 |         |>---(D)-- Authorization Code ---------'      |
 |  Client |          & Redirection URI                  |
 |         |                                             |
 |         |<---(E)----- Access Token -------------------'
 +---------+       (w/ Refresh Token)
Endpoints
/oauth2/authorize
This endpoint is used to initiate the authorization flow. The client redirects the user to this endpoint on our authorization server, along with some parameters. These parameters include:
response_type(mandatory): The type of response being requested. For now (and following the RFC) the value must becode.client_id(mandatory): The client's identifier, which must be registered with the authorization server.redirect_uri(mandatory): The URI to which the authorization server will redirect the user's browser after the user grants or denies permission. This must match one of the redirect URIs that were registered with the client when it was registered with the authorization server.scope(optional): The scope of the requested access, specified as a list of space-separated strings. See more about the supported scopes in this section.code_challenge(mandatory): The code challenge generated by the client application.code_challenge_method(optional): The method used to generate the code challenge. If not specified, the authorization server will useplainas default. It is recommended that this value be set asS256.state(optional): An opaque value used by the client to maintain the state between the request and callback. This parameter should be used for preventing CSRF attacks.
Scope
The scope of the OAuth authorization request determines which user resource you want the app to have access to, but it's limited to the API plan the app is registered to.
We currently support the following scope:
SITE: Provides access to static and measurement data (see Querying Measurement Data) about the Site, Data Source, and Device entities.
When using OAuth2 to request access to resources, it's important to note that users can only authorize access to resources that they currently have access to. If the user gains access to additional resources later on, these won't be automatically shared with the application. To authorize new resources, users will need to repeat the authorization process. There, they can choose to authorize all resources they have access to again or just the new ones. It is important to note that this will generate a new authorization code, which must be exchanged for a new and different access token.
Examples of authorization requests
This is an example of a GET request to the authorization endpoint. The parameters are passed in the query. The redirect URI (https://yourdomain.com/oauth2/solytic/result) must be URL encoded.
#!/bin/bash

curl -X GET "https://auth.solytic.com/oauth2/authorize?
    response_type=code
    &client_id=my-app
    &redirect_uri=https%3A%2F%2Fyourdomain.com%2Foauth2%2Fsolytic%2Fresult
    &scope=SITE
    &code_challenge=cu3UTNt3Qd2hxnR0NrbMvNA1T-8YYUVkQfiMIu0c6tg
    &code_challenge_method=S256
    &state=8rG3W4dDHl"
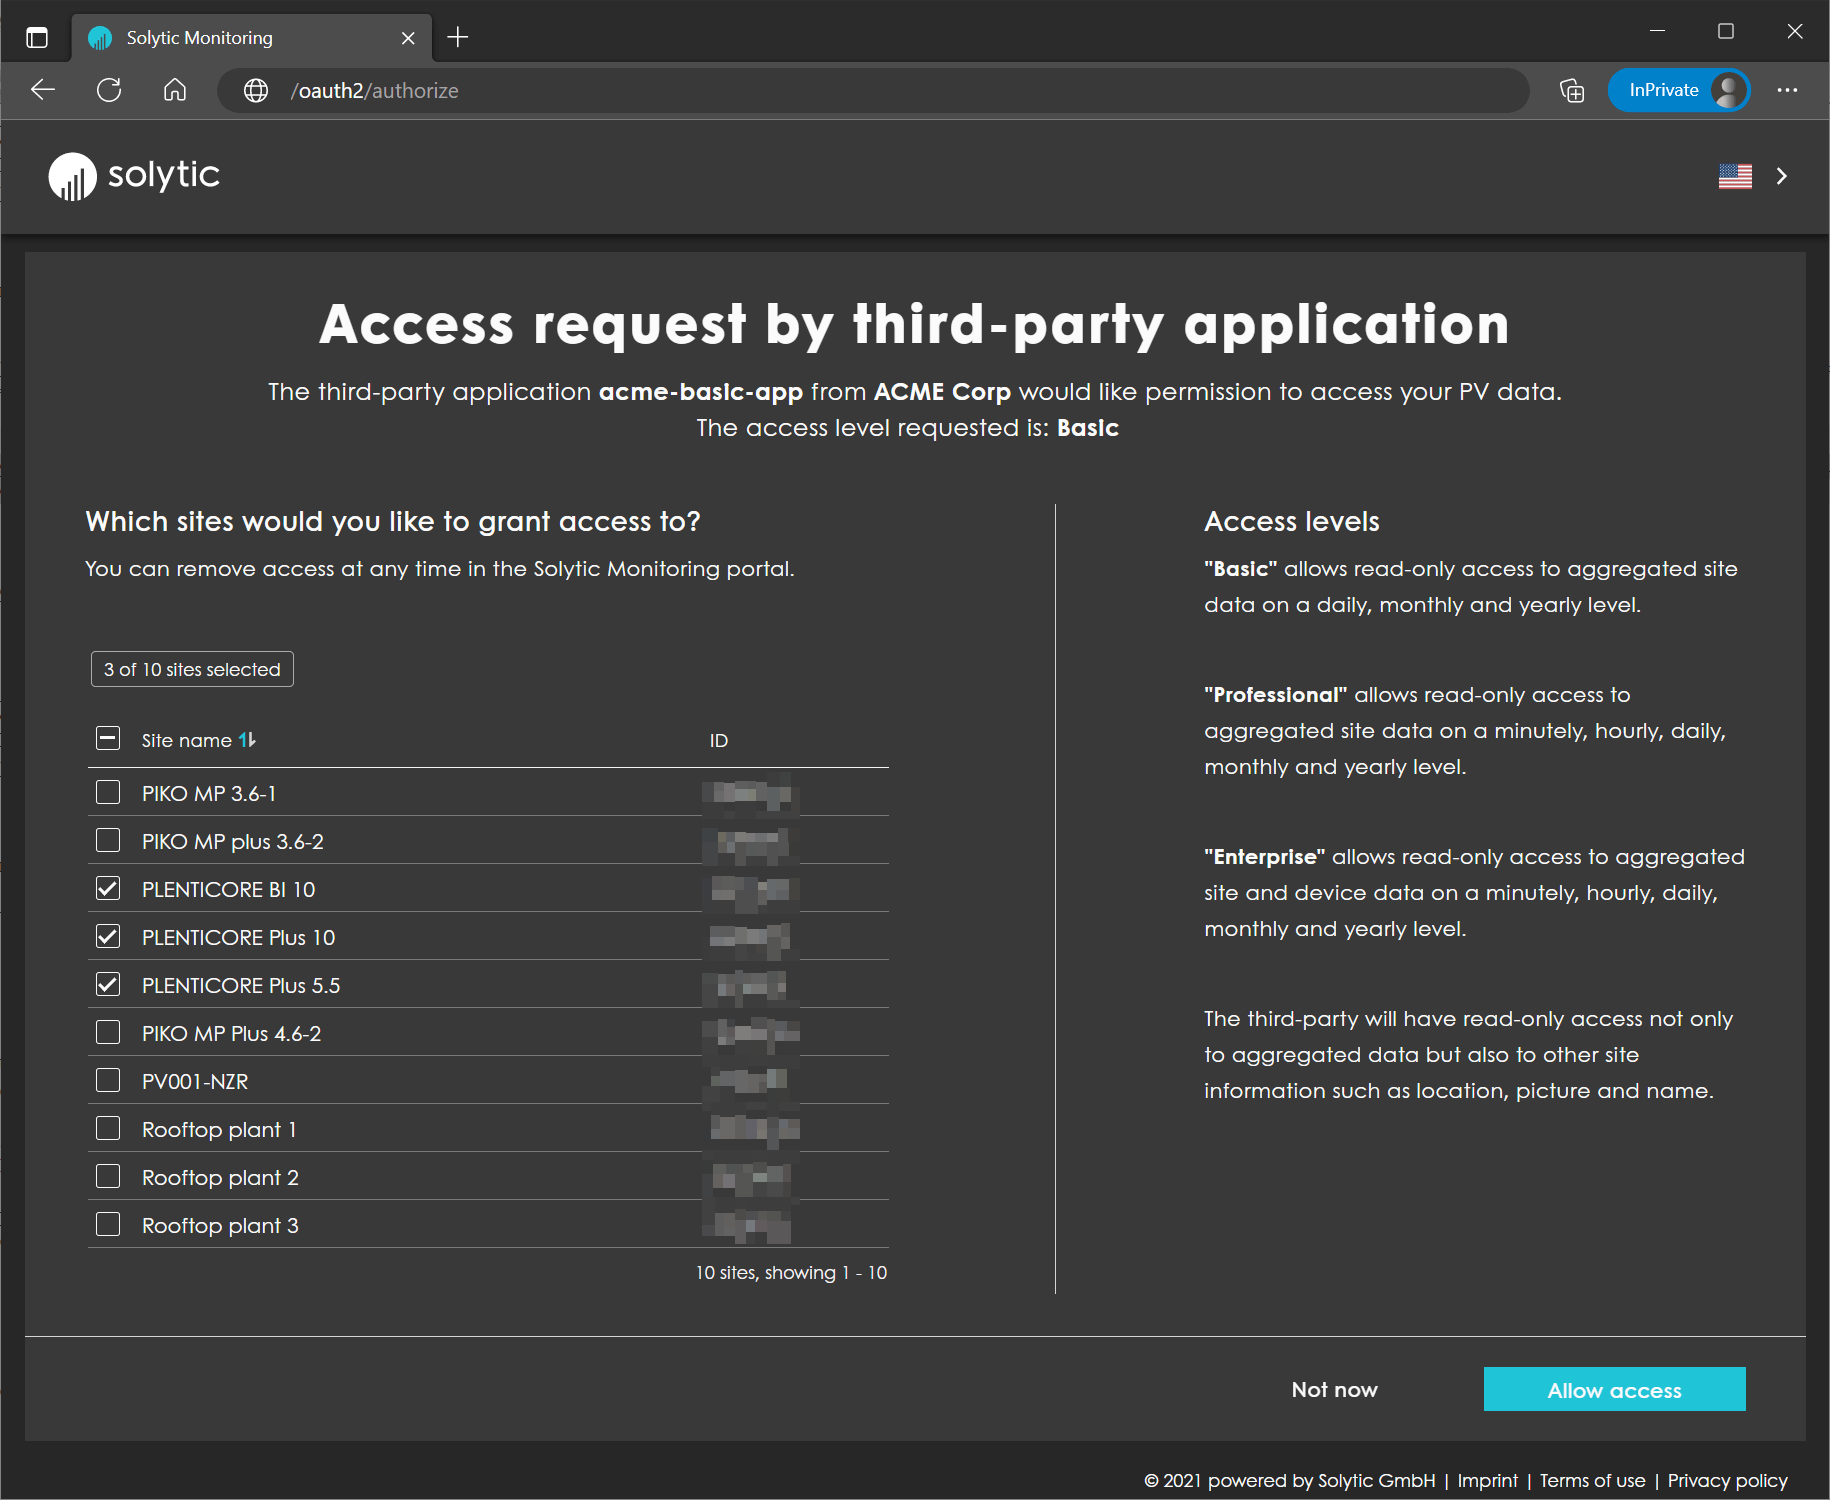
The user will be redirected to a login page where they must authenticate. From there, a consent page will be presented showing the list of resources to which the user has access, information about the client application (including plan and tier), and what information the client application will have access to if authorized by the user.
If the user authorizes or declines, they will be redirected back to the client application using the redirect URI. In case of authorization, an authorization code will be included as a query parameter.
Examples of authorization response
This is an example of a redirect request the authorization server will perform if the request is authorized by the user.
#!/bin/bash

curl -L "https://yourdomain.com/oauth2/solytic/result?
    state=8rG3W4dDHl
    &code=987fcbea-3592-495d-841f-cb7da55b9cdbLwNXCS3Ll0kbP"
This is an example of a redirect request the authorization server will perform if the request is declined by the user.
#!/bin/bash

curl -L "https://yourdomain.com/oauth2/solytic/result?
    state=8rG3W4dDHl
    &error=access_denied"
Authorization Errors
Please refer to the RFC 4.1.2.1. Error Response section to see the full description of the error codes.
/oauth2/token
This endpoint is used to exchange the authorization code for an access token. After the user has authorized the request, the authorization server will redirect the user back to the client's redirect URI, along with an authorization code as a query parameter. The client can then use this code to obtain an access token by sending a POST request to the token endpoint, along with the following parameters:
grant_type(mandatory): The type of grant being requested. For now (and following the RFC) the value must beauthorization_code.client_id(mandatory): The client's identifier, which must be registered with the authorization server.client_secret(optional ifAuthorization headeris provided): The client's secret, which must be registered with the authorization server.code(mandatory): The authorization code that was received from the authorization endpoint.code_verifier(mandatory): The code verifier generated by the client during the authorization code grant flow.
When making requests to this endpoint, the client can include an Authorization header to authenticate itself to the authorization server.
The Authorization header should contain the word Basic, followed by a space, and then the client's credentials encoded in Base64. The credentials should be the client ID and client secret concatenated with a colon and encoded as UTF-8, as shown in the following example:
Authorization: Basic base64(client_id:client_secret)
Examples of token requests
This is an example of a POST request to the token endpoint. The parameters are passed in the body of the request as x-www-form-urlencoded and include the grant type (authorization_code), the code obtained on the authorization endpoint, the redirect URI, the code_verifier, client_id, and cliend_secret.
#!/bin/bash

curl -X POST -H "Content-Type: application/x-www-form-urlencoded"
-d
    "grant_type=authorization_code
    &code=987fcbea-3592-495d-841f-cb7da55b9cdbLwNXCS3Ll0kbP
    &code_verifier=vJCxpsZUGj9YciIsUbhvbgpoxZf9fWlHyddjyOjgKKTp1WGm
    &client_id=my-app
    &client_secret=password123"
"https://auth.solytic.com/oauth2/token"
This is the same example of a POST request to the token endpoint but using the authorization header.
#!/bin/bash

curl -X POST -H "Authorization: Basic bXktYXBwOnBhc3N3b3JkMTIz==" -H "Content-Type: application/x-www-form-urlencoded"
-d
    "grant_type=authorization_code
    &code=987fcbea-3592-495d-841f-cb7da55b9cdbLwNXCS3Ll0kbP
    &code_verifier=vJCxpsZUGj9YciIsUbhvbgpoxZf9fWlHyddjyOjgKKTp1WGm"
"https://auth.solytic.com/oauth2/token"
Examples of token response
This is an example of a return in case of a successful request. The HTTP status code will be set as 200.
{
    "access_token": "eyJhbGciOiJIUzI1NiIsInR5cCI6IkpXVCJ9.eyJlaWQiOiI0Vk1LQ1QiLCJzdWIiOiIyNjU0OTciLCJqdGkiOiJhMDM2NGE2Zi1kYWM0LTQxY2UtYTk4My0wOGJjNDhjYjdmYzciLCJlbWFpbCI6InVzZXJAc29seXRpYy5jb20iLCJpYXQiOjE2NzQ3MjYzMTcsImV4cCI6MTY3NTMzMTExNywiaXNzIjoic29seXRpYy5jb20iLCJhdWQiOiJTb2x5dGljV2ViQXBpQXVkaWVuY2UifQ.dKqbWH-VdBVnvCUJAXEFCwYOywZVa-6k5dOGf5j7ucs",
    "token_type": "Bearer",
    "expires_in": 10080,
    "refresh_token": "CfKJ8MGNItgzIQFHq7mEDqUea7yePfhaMncUbzD0GxPZQgrsP0Qesm1zWce4h5LBJKs/KzqT3ndl/rO6VQyIJtu10NL5fTXI1SnNABYWYxJHt6jv+X1yQ9QC/O1oADjSns9Z5S+5UiYYjdyubD2fVTYUkDngGv8ASBKwjpBpXt7/yvox"
}
The access_token and refresh_token represent a connection between your
application and the authorization granted by the user. You must protect and keep
them associated with that user in your system. If you perform additional requests
(e.g., to access other resources/sites), a new pair of access_token and
refresh_token will be created for a new connection. However, it does not
invalidate the previous one unless the user revokes it (see Revoking a Request).
With the access_token and the api-key (which will be provided), your
application is ready to make requests to our GraphQL API. The following is a
simple example of a request that can be used to test your connection.
#!/bin/bash

url="https://solytic-api.solytic.com/api/graphql"
api_key="db77539c-b859-4098-bff0-81b464deadc"
access_token="eyJhbGciOiJIUzI1NiIsInR5cCI6IkpXVCJ9.eyJlaWQiOiI0Vk1LQ1QiLCJzdWIiOiIyNjU0OTciLCJqdGkiOiJhMDM2NGE2Zi1kYWM0LTQxY2UtYTk4My0wOGJjNDhjYjdmYzciLCJlbWFpbCI6InVzZXJAc29seXRpYy5jb20iLCJpYXQiOjE2NzQ3MjYzMTcsImV4cCI6MTY3NTMzMTExNywiaXNzIjoic29seXRpYy5jb20iLCJhdWQiOiJTb2x5dGljV2ViQXBpQXVkaWVuY2UifQ.dKqbWH-VdBVnvCUJAXEFCwYOywZVa-6k5dOGf5j7ucs"
query='{"query":"query SITES { sites { nodes { eid name } } }"}'

curl -X POST "$url" \
     -H "Content-Type: application/json" \
     -H "api-key: $api_key" \
     -H "Authorization: Bearer $access_token" \
     -H "Accept: application/json" \
     -d "$query"
Please refer to Your First Query to understand how to use the access token to consume our GraphQL queries and mutations, including the refresh token mechanism.
In case of an error, the HTTP status code will be set to BadRequest and the content will be returned as a JSON object. The following is an example of an error response:
{
  "error": "unsupported_grant_type",
  "error_description": "You must set 'authorization_code' as the 'grant_type'."
}
It is important to handle these error responses in your application and inform the user accordingly.
User interaction and workflow
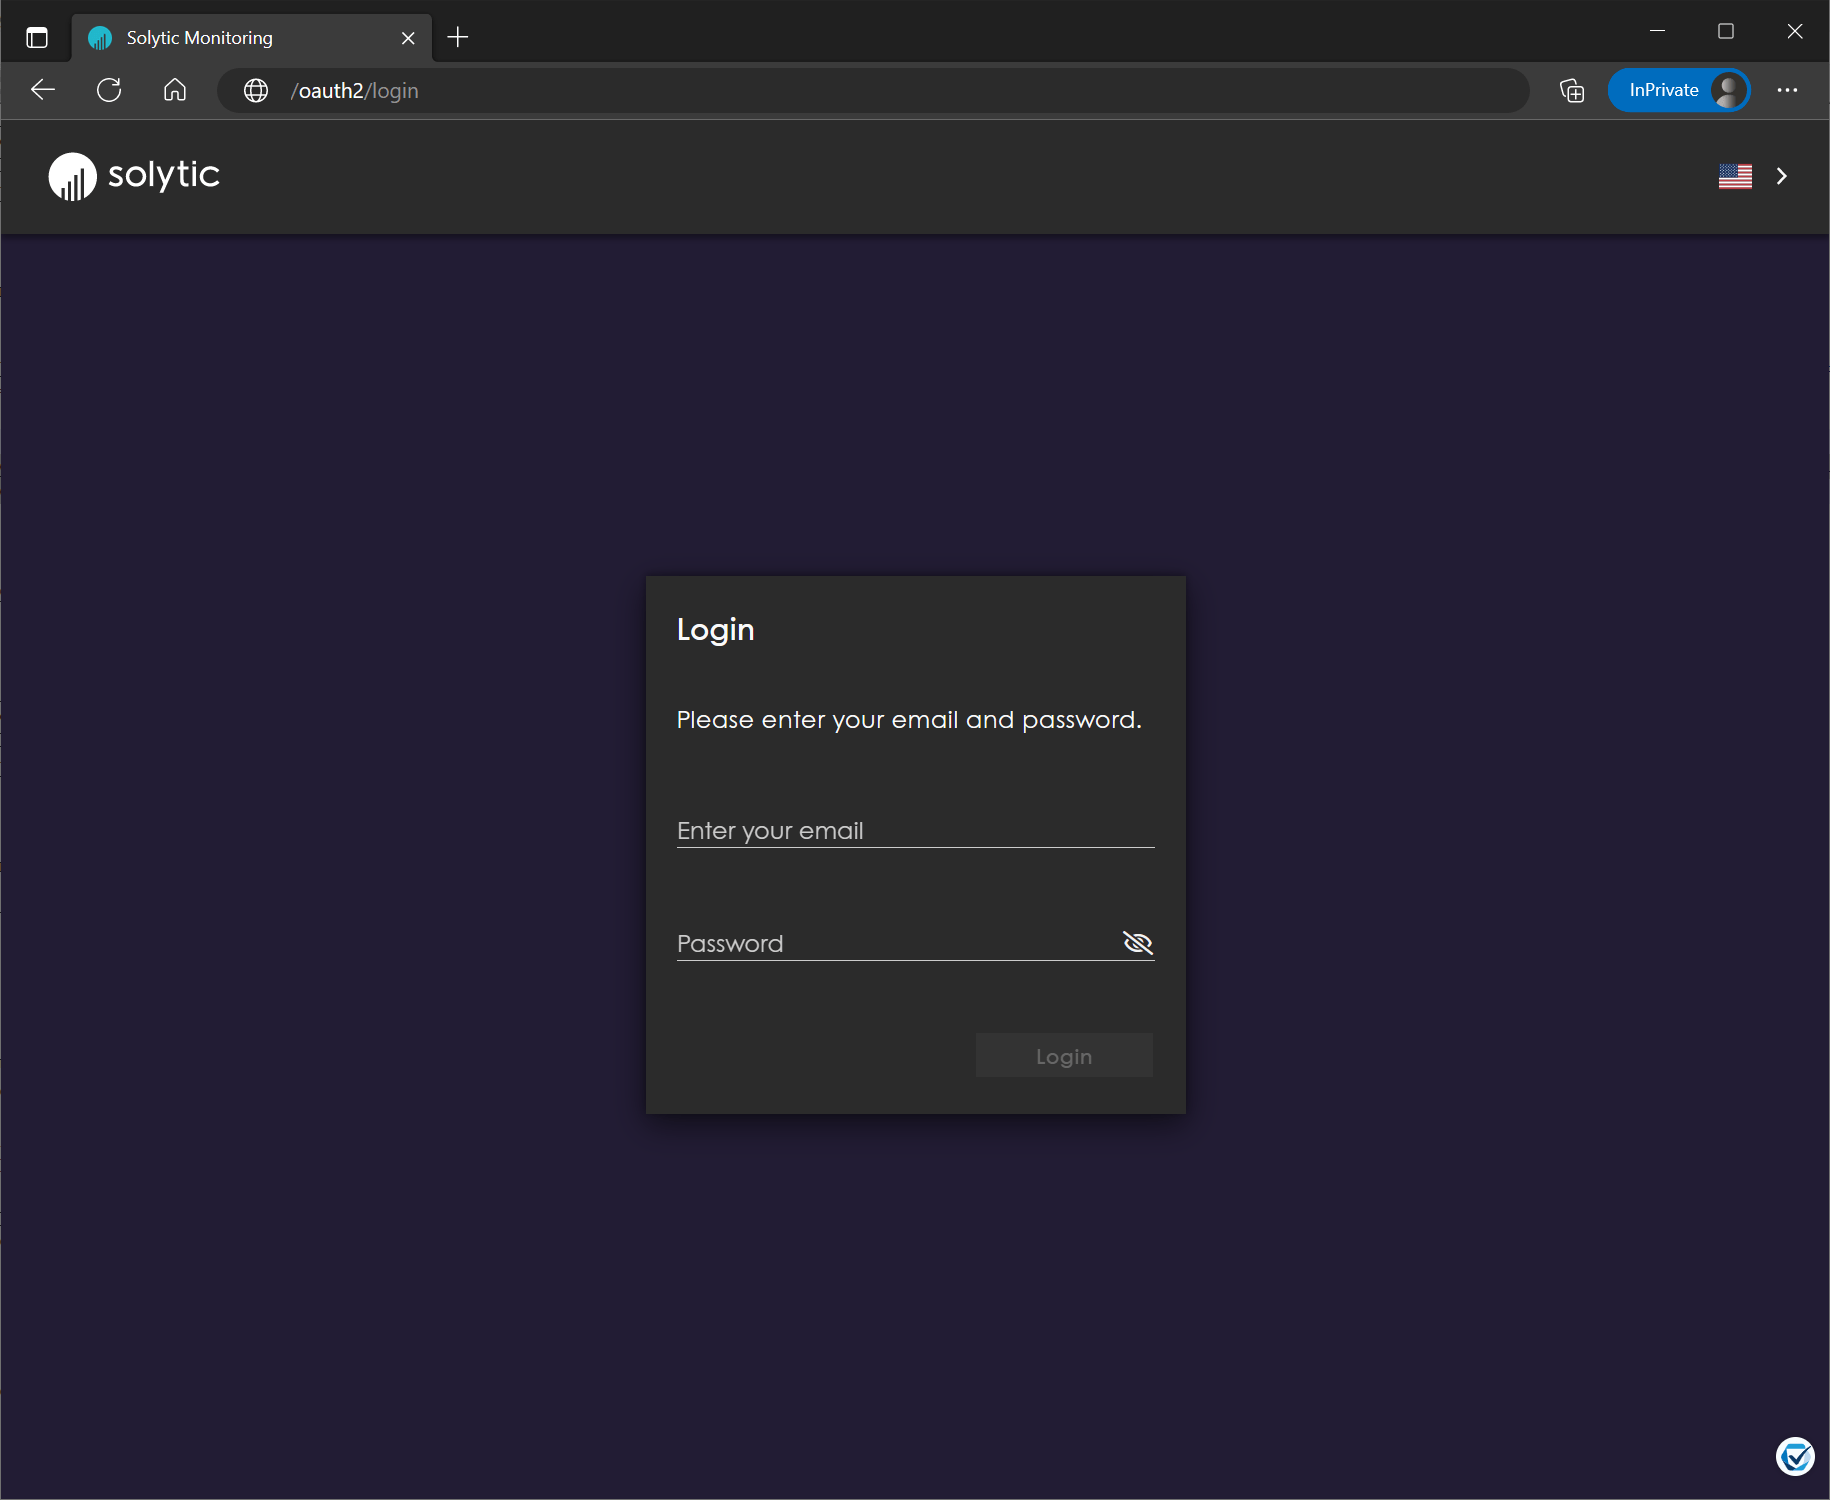
Login
When a user is redirected from the client application (e.g. Web browser), they will be presented with a login page. Only users who are already registered and have access to one of our white labels will be authorized to continue the flow.
Consent Page
On the consent page, all the resources that the user has access to will be displayed. They can select all resources or just a few of them. Once the user has selected one or more resources, the Allow access button will be enabled. If the user presses it, the request will be authorized and the user will be redirected back to the client application using the redirect URI specified in the request. It is important to note that the user has the option to grant or deny access to their resources, so it is essential to handle situations where the user denies access to your application.
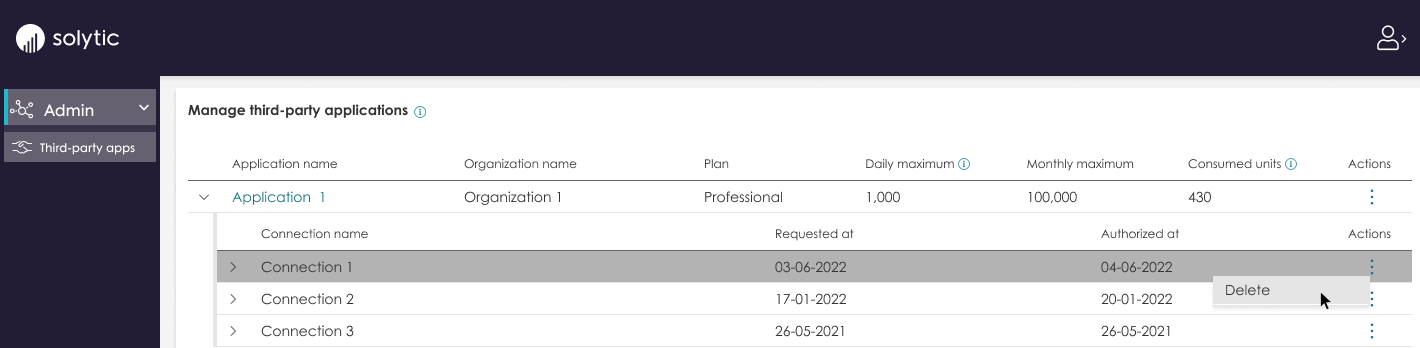
Revoking a request
Once a user grants access to an application for certain sites via OAuth2, they have the option to revoke this access at any time by navigating to the third-party apps page. On this page, a list of all authorized requests made by the application will be displayed, and if necessary, users can remove access by selecting the "Delete" button. It's important to note that unless a user revokes all other connections, any previous requests that were authorized will still be able to access the authorized resources.